SUPER 125 Install
These tips are here to help with your installation. Please consult this guide before contacting us directly.
Professional installation is highly recommended. Absolutely no warranty is provided with these race parts.
Piston
- The piston rings should already be pre-gapped as they are already installed on the piston.
- Make sure the piston is installed with the “IN” mark facing upward. The “IN” stands for “INTAKE” which refers to the valve. Our intake valve is 27mm while the exhaust valve is only 23. Failure to install this in the correct position will damage the valves and also destroy your piston.
- Clock the top two rings 180 degrees apart from each other. The most common way people do this is to have one ring face at 3 o’clock and the other ring facing 9 o’clock (you can also do 12 o’clock and 6 o’clock).
Head
- Parts of your stock head must be transferred over to the new head with the exception of the exhaust gasket as we provide a new one. Pay attention to the rocker arms and pins. The rocker arms are labeled “I” (intake) and “E” (exhaust) while the pins are different sizes. Put them aside and make sure you know which one is which.
- After the head is installed, put the rocker arms and pins back into their respective place. The top valve is “I” (intake), and the bottom valve is “E” (exhaust).
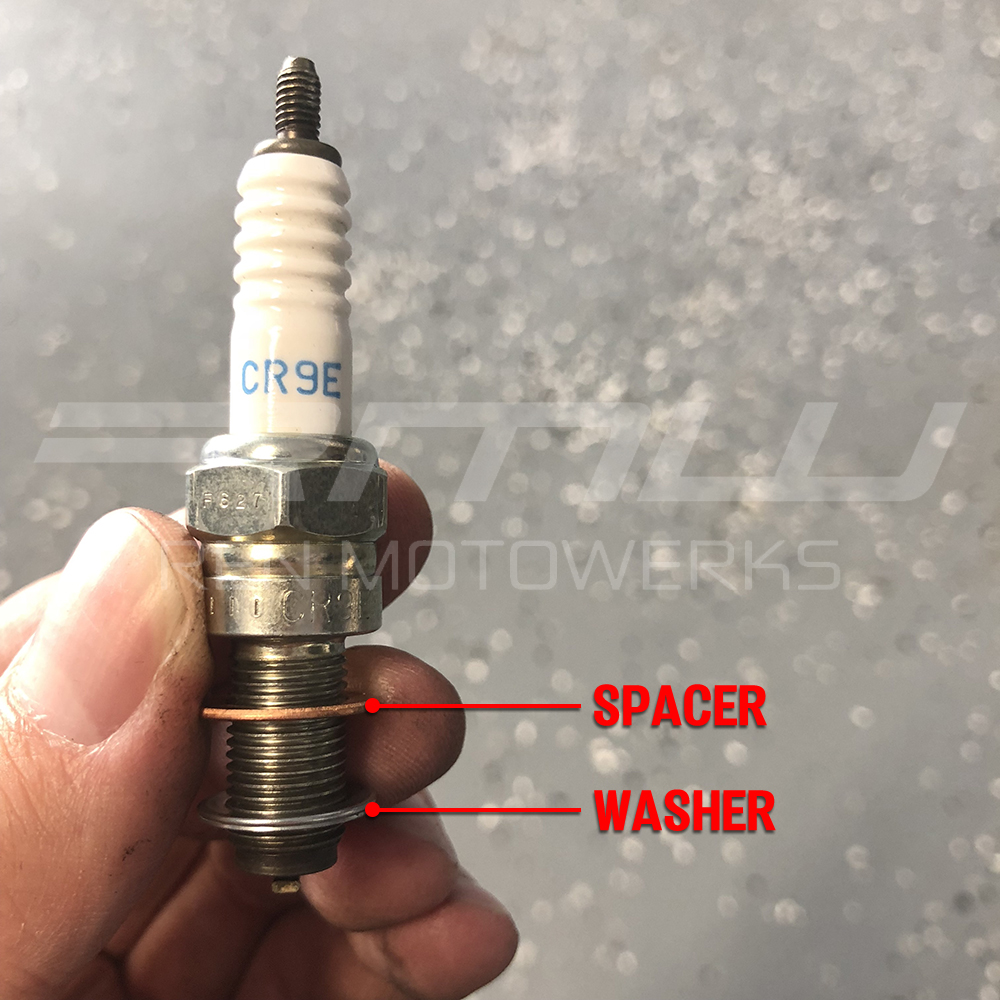
- It is recommended to install the NGK CR9E spark plug with an additional washer to provide extra assurance that the piston will not hit the spark plug (if purchasing from us we provide an extra brass washer). This washer is provided with the spark plugs we sell. Failure to keep the proper gap on the spark plug will cause damage and inconsistent behavior with the power output. Be sure to remove the washer, install the spacer, then re-install the washer so it’s stacked like this.
- Our SUPERHEADS have a section ground down inside where the camshaft sits. This is necessary to fit the SUPER 150 cam. See the image here for details on how it should look.
Cylinder
- Reusing your old cylinder is your choice. I’d say if your bike has over 500 miles you should be OK. If your bike has high mileage, it is up to you whether to start fresh with a new one or re-hone your existing one. This is completely up to you and how you take care of your bike during the break-in process. Improper break-in procedure will cause your piston rings to not seat properly and will cause failure.
- Our SUPER 150 kits come with a new cylinder so you MUST break this in. I recommend a HARD BREAK-IN procedure which you’ll undergo an extreme process of oil changes. Use MINERAL oil when breaking in the bike. At 500-1000 miles, then you can use synthetic. You should have a Kitaco Clutch cover installed to help you assist with oil changes (25mi, 50mi, 100mi, 250mi, 500mi).
Camshaft
- Check the SUPERHEAD and make sure that inside the chamber where the camshaft goes that there’s an area that is ground down. Due to the OEM head being cast aluminum, they often have different clearances. You want to be 100% sure this section is grounded down before installing the camshaft or it will not spin.
- Before adjusting your camshaft, you must be 100% sure your timing is correct. The crank position should be at “T” (for top dead center) and the circular mark on the cam gear should line up with the notch on the head. More information on this can be found on various YouTube channels.
- For SUPER 125 kit using the TBOLT camshaft, adjust the Intake and Exhaust valve lash to .003″. For SUPER 150 kit using our SUPER 150 camshaft, adjust the Intake and Exhaust valve lash to .002″.
- Make sure your feeler gauges are in inches and not millimeters. Note: The intake valve is the most common part to fail (if there is a failure) and it can be caused by setting the timing and or lash incorrectly so triple check everything before you start your engine. These types of mistakes are NOT covered under warranty.
Fuel
- You MUST have a fuel computer to run our kits! ARACER is recommended! Power Commander, Bazzaz, and Finbro ECM are NOT recommended as they will make your bike run horribly! Invest in the brains of your bike!
- Premium gas is required (91 OCT or higher)! Make sure you’ve got this before starting the bike! If not, drain your fuel and add it in.
- Sometimes the fuel line provided may have an extra insulation layer on top of the hose. You can cut this off by using a razor blade (be careful not to puncture the fuel line below.
- One end of the fuel line is 90* and the other is straight. It does not matter which way you install the line. Orientation may depend on the year of your bike since the OG fuel pump is on the bottom while the SF fuel pump is on the top.
Throttle Body
- All of your parts from the stock throttle body MUST be transferred over to the KOSO Throttle Body. This includes o-rings, sensors, etc.
- If you have purchased the KOSO Throttle Body from us, we always provide the brass screw. This brass screw requires the spring that is apart of the stock air idle screw (black plastic one). Failure to install the spring WILL cause your brass screw to fall out and will cause a big headache after you find out your bike isn’t idling correctly. If you DO NOT have this screw, I highly recommend it.
- Adjust your air idle screw starting with 1 full turn out. You can adjust this later but you should not need more than 1-1.5 turns.
- Next is the hardest part of the entire installation. Adjusting the idle is extremely painful and takes patience. The throttle stop screw should be adjusted AFTER you have attempted to start your bike. If your bike does not hold idle, you will need to adjust the throttle stop screw to allow the throttle to become more open. This allows air to pass through the engine. Your target RPM should be between 1400-1600 RPM (but adjust to your preference).
- TIP: Have a friend hold the throttle open to the appropriate RPM and adjust the throttle stop screw to the correct position. Instruct the friend to let go of the throttle and see if the bike will idle on its own.
- If you have an ARACER product, you’ll need to calibrate your TPS to 0%. Please consult our ARACER Setup Guide here.